Centos 7 Extend partition with unallocated space
22:23 08/09/2024 | 383There are three steps to make: 1. Alter your partition table so sda2 ends at end of disk 2. Reread the partition table (will require a reboot) 3. Resize your LVM pv using pvresize 4. Resize LV and filesystem
There are three steps to make:
- alter your partition table so
sda2ends at end of disk - reread the partition table (will require a reboot)
- resize your LVM pv using
pvresize - Resize LV and filesystem
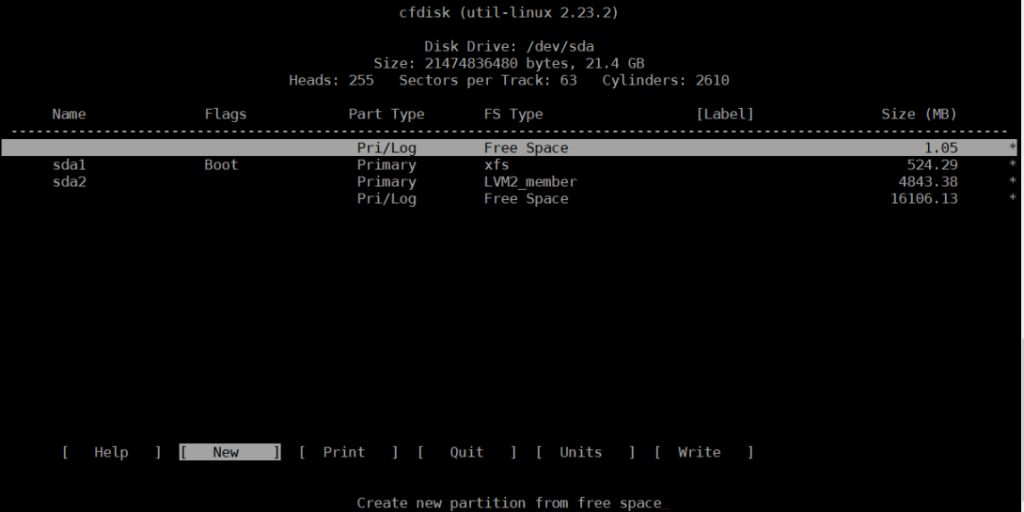
Step 1 - Partition table
Run fdisk /dev/sda. Issue p to print your current partition table and copy that output to some safe place. Now issue d followed by 2 to remove the second partition. Issue n to create a new second partition. Make sure the start equals the start of the partition table you printed earlier. Make sure the end is at the end of the disk (usually the default).
Issue t followed by 2 followed by 8e to toggle the partition type of your new second partition to 8e (Linux LVM).
Issue p to review your new partition layout and make sure the start of the new second partition is exactly where the old second partition was.
If everything looks right, issue w to write the partition table to disk. You will get an error message from partprobe that the partition table couldn't be reread (because the disk is in use).
Step 2 - Reboot your system
This step is neccessary so the partition table gets re-read.
Step 3 - Resize the LVM PV
After your system rebooted invoke partx -u /dev/sda2 && pvresize /dev/sda2. Your Physical LVM volume will now span the rest of the drive and you can create or extend logical volumes into that space.
Step 4 - Resize LV and filesystem
In this command centos is the PV, root is the LV and /dev/vda2 is the partition that was extended. Use pvs and lvs commands to see your physical and logical volume names if you don't know them. The -r option in this command resizes the filesystem appropriately so you don't have to call resize2fs or xfs_growfs separately.
# lvextend -r /dev/mapper/centos/root /dev/vda2
Cùng chuyên mục Tài Liệu Công Nghệ
How to Upgrade ESXi 6 7 to 7 0 without vCenter (441) 05/10/2024
How to add a USB Disk as VMFS Datastore in ESXi (404) 30/09/2024
Wubuntu – New Linux Distro looks like Windows 10 - 11 (309) 15/09/2024
How To Install and Configure GitLab on Ubuntu (363) 12/09/2024
How to setup your own SVN (subversion) server in Ubuntu 20 (441) 11/09/2024
How to scan CentOS server for malware (335) 08/09/2024
Cài đặt Tomcat 9 trên CentOS 7 (259) 08/09/2024